Saturday, December 22, 2012

Baking from the garden

Our garden veggies have leant themselves to many a lunch and dinner: stir fried, roasted, pickled...but all too often, dessert gets overlooked. (Though who could forget the garlic chocolate chip cookies?) But it was the end of the semester & the end of another wonderful season for the growers, and I wanted to do something special to make this gathering memorable. That's where the cake comes in.

Thanks to our hoop tunnels, the ground doesn't freeze. So we can leave beets in the ground and harvest at our leisure. Which is precisely what I did when I got it in my head to make red velvet cake dyed with beets! Surely, this would make the evening a celebration...and if the cake wasn't enough, well...the cream cheese frosting would be!

I researched. There are a lot of blogger/baker/amateur-scientists who have put their minds to the question already. The challenge, according to blogosphere, is to keep the cake acidic, so that the beet juice stays red, rather than browning in the oven.

In the end, our lack of good food processor led me to choose this recipe

this is the batter before we put it in the oven!


It was quite easy to follow. I used whole wheat flour, unrefined sugar, and I only had one cake pan so I couldn't layer it. Therefore, I only needed about half the frosting, so I mixed one 8 oz. package cream cheese with one stick of butter and added confectioner's sugar and vanilla to taste!

this is the cake out of the oven but still awaiting the frosting

Yum!


Sunday, November 4, 2012

Gleaning Adventure

While we're busy harvesting greens and prepping our beds for winter here on campus, farms in the area have been rushing to get their last summer vegetables harvested before it starts to snow. Ioka Valley Farm invited a team of volunteers to harvest their squash for donation to a local food pantry, a process of sharing the harvest known as "gleaning." Erik Romano '15 had a chance to check it out--here's what he has to report!


"On Sunday October 28th, I had the opportunity of going gleaning pumpkins, squash, and gourds near Ioka Valley Farm. For those who don't know what gleaning is, we basically harvested food that would otherwise go to waste (in this case, it goes to a local pig farm, because "pigs can literally eat anything" according to one of my fellow volunteers) and donated it to the Friendship Center, a food pantry in North Adams. It was a beautiful day, a bit chilly, but the weather was refreshing. There were hundreds of pumpkins, butternut squash and gourds on the field. We obviously couldn't harvest them all seeing as our group of volunteers consisted of around 10 individuals, me being the youngest by far. Unfortunately, a lot of squash was mushy due to the frost, but we picked what we could. We picked varieties including, butternut, delicata, acorn, sugarplum, and hubbard. I didn't know this before, but there are types of pumpkins bred to be jack-o-lanterns and ones bred for consuming, and the ones on the field were large jack-o-lantern-ready pumpkins. There were some smaller, darker orange pumpkins that were pie-ready as well, but fewer in quantity. I loved looking for the craziest alien gourds, which come in all shapes, colors, and sizes. Afterward, we stopped by a local school to give pumpkins for carving, and then drove the squash and gourds to the Friendship Center, who was happy to take them off our hands. I had an amazing time, especially since I was helping out those in need!"


Monday, October 15, 2012

Viking Funeral for Blighted Tomatoes

This past Saturday night we had a traditional Viking Funeral for our blighted tomatoes.  Why you might ask did we do this?  Blighted tomatoes must be disposed of properly, and although this what most farmer's might recommend, we felt that a good old celebration of our tomatoes in viking fashion might be the wacky kind of activity college gardeners could get excited about.  And they did!  We had a great turn out of 15 brave souls to wander through the darkness down Cole Field to the Hoosatonic River.

The tomatoes were lashed to a board, which was salvaged from the transfer facility, with rope from the garden shed.  Four pallbearers carried Thorn, our viking tomato king, down through the woods to the water's edge.  As the flames were prepared, a poem in Olde English was read and the mood turned somber.  Two volunteers donned waders, typical for fly-fishing, and entered the water with Thorn.  The board was lit, and the board was pushed out onto the still water.


As the flames drifted down into the darkness a second passage in Olde English was read.  We raised our glasses to honor Thorn, and the festivities finished.  It was a spontatneous celebration and memorial of our tomatoes.

Monday, September 24, 2012

Garden Dinner

Welcome back, gardeners!
After an incredible and bountiful end-of-summer harvest, the Williams Sustainable Gardeners, with the help of Dining Services, held the second annual Harvest Dinner. This year, the superb weather allowed for the dinner to take place in Parsons Garden. Much of the menu consisted of produce that was grown right in the garden where it was served!

The Harvest Dinner Menu:
Tossed Salad
Garlic Knots
Roasted Garden Squash
Pickles and Pickled Beets
Grilled Corn on the Cob
Baked Potato Bar with Goat Cheese and Chives
Apple Pie with Maple Yogurt
While much of the produce grown this summer has since been harvested, many greens, tomatoes, and herbs continue to grow. We will also be planting more greens and wheat in the near future. We also hope to expand our horizons and our learning by partnering with other groups on campus.
Coming next time... Taste the Rainbow! WSG and QSU unite! 

Thursday, August 16, 2012

A New Fence for the Garden

Deep in the heart of Williams campus, behind a wall and beside a large, white house, there lives a garden.  Few know of its existence and fewer still have ventured within.  This, the Presidential Garden, is one of the best kept secrets at Williams.  If you ask the average Williams student about the garden, they might raise their eyebrows and ask if you're on the right campus.  Sometimes I wonder if Adam Falk even realizes there is a garden in his yard.

At the beginning of the summer, the garden's low profile may have been fitting - it was unkempt and overgrown, with more weeds than vegetables in sight.  With a bit of clean up, however, it began to look quite respectable.  
The garden, post weeding extravaganza.
I decided then that the Presidential Garden deserved more attention than it had been getting.  So when Brent suggested that we build a new fence for the garden, I was easily convinced.  Ever since then, he and I have been dreaming and scheming about every kind of fence imaginable.  Images of bamboo fences, classic white picket fences, fences made of bricks, stone, and wrought iron - all of these have crossed my mind.   

As we planned the fence, Brent and I had to keep a few specifications in mind.  Originally built to keep out hungry bunnies, the fence had to be practical; this meant chicken wire buried about a foot underground.  And because of its snazzy location next the the Presidential abode, it had to be aesthetically pleasing.  It also needed to be as permanent as possible, so that it could be enjoyed by generations of Williams gardeners to come.  So when Drew Jones of Hopkins Forest offered us a large supply of old split rails made of black locust, we knew we were in luck.  Not only would the rails fulfill all of our requirements, they were free.  And they would lend a much-needed rustic edge to the perfection of the President's yard.  We decided that the fence would consist of wire fencing stretched between the sturdy rails, with a gate made of salvaged boards and chicken wire. We set the ambitious goal of finishing the project, including the gate that went with it, in a single day.

Construction of the fence began early one warm day in July.   With the help of post hole-diggers, rock bars, and student workers from Hopkins Forest, we dug over 20 two-foot-deep holes into the rocky soil of the Presidential yard.  Raising the tall rails into the holes, we set them straight and packed the soil tightly around them.  

Once all the rails were in place, we unrolled a large bundle of wire fencing, stretching it taut and nailing it tightly between each post.  (We were disappointed to find that our 50 ft roll was several feet too small to fit the perimeter, a problem we fixed later by patching the gap with chicken wire).  We repeated this process with a smaller roll of chicken wire, lowering it into a trench we had dug and burying it in the soil to deter garden pests.  At the same time, we added a layer of black weed barrier, hoping to keep weeds from entering the garden from the outside.  

The final challenge was constructing a gate for the garden that would fit snugly and swing freely.  We fit the salvaged boards carefully to the shape of the gap we left in the fence, screwing them in place.  Next, we screened the frame with chicken wire.  The trickiest part was screwing the hinges into the gate and then into the rails, taking care to keep the gate at the appropriate angle above the ground.  With a few minor adjustments, the gate was in place!  It was incredibly satisfying to open the gate for the first time, it swinging smoothly to let me into the garden.  Voila! A new fence for the garden.

A watermelon in the President's yard.

Now, the Presidential Garden overflowing with ripe corn, winter squash, watermelons, cantaloupes, and beans!  Complete with painted vegetable signs, I'd say its quite deserving of its new defenses.  So if you're ever in the neighborhood of the Falks, you should stop on by.


Tuesday, August 14, 2012

Thoughts on the Summer

Here's a link to a reflection I wrote about my time in the garden this year.  Enjoy!

http://sustainability.williams.edu/sustainable-food/grow

(E)scape!


Hi, everyone!  I’m sorry it’s taken me so long to post.  Things have been pretty busy around here.  However, just because I didn’t post doesn’t mean there wasn’t anything to blog about!  The last couple of months have been filled with exciting projects and even more exciting produce.

For instance, at the end of June, the Garden held an (E)scape party – a party for pickling scapes!  At the same time, we made pesto from the vast quantities of arugula we harvested and the garlic leftover from last year.  I’ve posted both recipes below, in case you ever find yourself overwhelmed by either of these vegetables. 
Brent and Cedar with garlic from the garden

The canning apparatus (to the right)
I’ve never canned before, so I was thrilled to get the opportunity to try my hand at it, under the knowledgeable guidance of Brent.  The whole process is pretty extensive, but it’s a wonderful way to make sure you’re eating your own vegetables all year round!  The procuedure breaks down into several distinct steps: washing, chopping, preparing the brine, blanching, filling, and sealing.
Washing the scapes

The biggest concern with canning at home is preventing growth of the bacterium Clostridium botulinum from occurring after you’ve sealed your jars shut.  C. botulinum is a nasty little bug that .  It colonizes the gut, leading to respiratory and musculoskeletal paralysis.  That's why it's so important to start with very, very clean mason jars (we washed ours thoroughly before using them).
Clean mason jars

Blanching in brine
Fortunately, the bug can be destroyed by boiling for a few minutes and by keeping the pH of your brine within a certain range.  Blanching the scapes for a minute takes care of both of these steps, cooking the bacteria and ensuring an even pH both inside and outside the vegetable; thus, blanching is a key step in the canning process. 

The scapes, in all their glory
After blanching the scapes in our brine, we packed them as tightly as possible into mason jars.  Then, we filled the remaining space in the jars with brine, knocking out all the air bubbles we could find. 

Finally, we closed the jars by placing them in boiling water until a seal was created  under the lids.  

Voila – pickled scapes!  


Garlic Scapes
Pickling brine and process instructions

Brine ingredients:
4                cups                           apple cider vinegar
3                cups                           water
1½            cups                           sugar
3                Tablespoons            kosher salt
as needed                                    spices

Procedure:
1)     Wash and cut garlic scapes into jar-length segments, keeping the straight pieces and curved pieces separate.
2)     Pre-heat the jars and lids.
3)     Mix brine ingredients and bring to a boil. Add spices to brine, if desired.
4)     Test the brine pH (should be ≤ 3.9).
5)     Blanch the scapes in the brine: boil one minute.
6)     Remove the scapes and strain the spices out of the brine, if used.
7)     Pack the scapes into clean warm jars. Curl the curved portions on the outer part of the jar, and put the straight portions in the center of the jar.
8)     Top off the jars within 1/2” of the top with hot brine.
9)     Seal the jars finger tight.
10)   Process the jars in a boiling water canner: quarts for 15 minutes, and pints for 10 minutes.
11)    Allow the jars to cool before handling.
12)    Test the equilibrium pH; it should be ≤ 3.9.

Sunday, June 17, 2012

Orange, and Yellow and Red, Oh My!

This is just a quick post to share the huge variety of carrots that are growing in Williams garden!  There are have several strains growing within a single bed in Parson's: Minicor, Cosmic Purple, Scarlet Nantes,Yello, and Nelson.  The Cosmic Purple, deep crimson with a bright orange interior is my favorite carrot, and quite a bold vegetable indeed.  It seems to grow to a much more imposing size than do the other varieties.

The bed wasn't thinned properly, so we also got some pretty interesting carrot shapes!

The orange one in the middle looks like a squid.


This evening, I used garden carrots to make a lovely carrot, snap pea, avocado, and cilantro salad.  Quite refreshing!  I think the different varieties of carrots are beautiful together.  From now on, I plan to be permanently dissatisfied with plain ol' orange carrots from Stop and Shop.

Who knew carrots took so many different forms?

Wednesday, June 13, 2012

Bunnies, bunnies, everywhere!

I was pretty reluctant to post a story about this, because I think it might be the most interesting thing that happens in the garden this summer.  However, I decided that it was too exciting not to share!  Just promise that you'll keep on reading.

I was watering the greens the other day when, lo' and behold, the earth started to move under the chard!  I leaned closer to take a look.  Pushing aside a giant leaf, I realized that what I thought was dirt was actually a sizeable hole in the ground, convincingly camouflaged with fur and dead leaves.  And what did I find sticking out of the hole, but several tiny bunny ears and tiny bunny noses!  As I observed, the patch of ground started to wiggle and more bunny limbs came poking out of the hole.  Rabbits were living - where else? - in the cabbage patch! (Technically, the bed only contained one row of cabbage, but the cliche of rabbits in a cabbage patch is just too hard to resist.)  

Unexpected visitors (or am I the visitor?)

The bunnies were very hard to see at first, but I eventually counted 5 of the little guys huddled together.  They didn't seem very happy to have been watered, but didn't look like they would be moving any time soon.  Which left me with a dilemma: rabbits aren't known for their gardening skills.  In fact, they're pretty terrible at gardening.  Quickly dispelling dreams of a private garden workforce of pet rabbits, I realized the bunnies wouldn't be any help at all - and might even *gasp* eat the plants!  It was even pointed out to me that rabbits can reproduce in 3 months, yielding an exponentially increasing army of bunnies that would take over the garden and, eventually, the entire Williams campus.  Something had to be done.  

One of the cutest things I have ever seen.
I decided that the bunnies needed to be relocated elsewhere.  However, I still wasn't sure how to move them.  Thankfully, my friend Anna had an idea.  We would put the bunnies in the box!  This method seemed pretty ideal, until the bunnies realized that we were after them.  After we picked up the first one, a couple stayed in the nest, but the rest of them started hopping away!

A rogue bunny!
Luckily, baby bunnies aren't great at hopping and didn't venture outside of the bed of greens which they liked to call home.  It wasn't too much trouble to track them down and scoop them up, one at a time.

After a few minutes of rabbit-wrangling, we had them all trapped safely in their box.  Catching the bunnies was both wonderful (they were so soft!) and horrible (they were pretty unhappy) at the same time.  Most of them tried to jump out of the box.  Somehow, they didn't seem comforted by the bok choy and chard with which we covered them.

A boxful of bunnies
After arguing over which part of the bunnies was the cutest (their miniature paws or their tufty tails?  Or their little twitchy noses???) Anna and I did some internet research about how to relocate families of rabbits.  We soon determined that they were likely old enough to live on their own, and picked up some interesting facts along the way (ex. Did you know that mother bunnies must lick their young offsprings' genitals to help them pee? Whouldathunkit.)

Box in arm, we set off across campus to find a new home for the bunnies.  After scouting out a decent spot in the drizzly weather, we released them into an overgrown, wooded area far, far away from the garden.

As we watched them scamper off into the underbrush, we wished them a safe and happy life eating someone else's vegetables.  

Summer in the Garden

Hello, gardeners and garden connoisseurs!

Welcome to summertime in the garden.  My name is Alix Wicker and I'm the Zilkha Center intern in charge of tending to the Williams garden for the next few months.  I'm incredibly excited to have the opportunity to build and explore the garden, and to share the results with all of you!  I hope to learn quite a bit about every step of food production - from planting to harvesting to cooking to eating - along the way.

A bed of yummy lettuce
This season is beautiful in Williamstown, and the weather has been lovely for the short time I have been here.  I snapped some photographs of the garden last week when I had the chance to sneak away from my duties working at Reunion.  So much is in season!  The garden is practically overflowing with snap peas, carrots (5 different kinds!), lettuce, radishes, bok choy, kale, chard, broccoli, and garlic scapes.  I turned most of those vegetables into a stir fry last night - my first meal of many from the garden.

The sugar snap peas are to-die-for.  The huge, sprawling pea plant has continued to spread, claiming most of the bed as its own (which I am perfectly OK with).  I plant to stake the plant sometime soon so that it can continue to expand!  I like the snap peas best straight from the garden and I couldn't help but eat almost all of them when I was harvesting for the Zilkha Center lunch today.

The best thing ever.

The kale has flourished, as well.  I think this beautiful variety is Red Russian kale, but I'm not quite sure where I took the picture.  With the help of dining services, I plan to cryovac the kale and save it for use all year.

Red Russian kale
The radishes come in many varieties, some of which turned out rather strangely.  I've included one of the more interesting pictures below.  Unfortunately, many of the radishes were past their prime or had been eaten by insects.  I managed to salvage a few of them to share at lunch today.
Purple Plum Radish
French Breakfast Radish


We held our first harvest last week, gathering snap peas and salad greens for dining services to use during Reunion Week at Williams.   Only a small group of us attended, since most students hadn't yet returned to campus.  It started to rain just as we were finishing, but Kendra, Cedar, and I managed to harvest quite a bit, both for the college and for ourselves.  There is lots more eating to be done!  


Kendra with her bounty of garlic!

Thank you for reading!  Please keep checking the blog.  I will try to keep it updated a few times a week with photos and recipes (and I will hopefully post more later today).
Happy gardening,
Alix


Tuesday, May 29, 2012

Salad Bar-ty

Time for some overdue pictures from our end-of-the-semester celebration: we harvested lots of salad greens (spinach, arugula, various lettuces) and radishes, and everyone brought toppings to share in our makeshift salad bar. We also had rhubarb crisp for dessert, made with the vintage rhubarb transplanted from the old Kellogg garden! 

Jacob and Lucy chopping radishes

 Sample salad

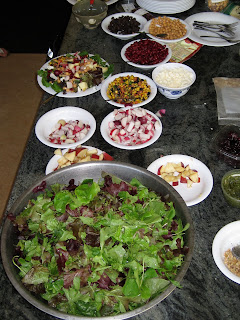
Salad bar in Mission Kitchen (check out the huge bowl of garden greens!)

Eating outside Mission

The dinner was also an opportunity to celebrate the wonderful Lauren McDonald, a founding member of WSG who has been an invaluable part of the group for the last two and a half years--she was even our first summer garden intern! Thanks for everything, Lauren--we'll miss you lots but know you'll be back to visit!

Speaking of summer in the garden, if you're going to be on campus at all this summer and would like to help out in the garden and eat lots of delicious food, email our fabulous intern Alix at jaw1@williams.edu and she will add you to the summer garden listserv!

Sunday, April 1, 2012

Grow Cart!

This spring we started seeds in a grow cart in Dodd basement, thanks to the Biology Department and Brent Wasser with the Sustainable Food and Agriculture Program. Check it out:


Another huge thanks to Brent for watering over break, so we should be all set to plant seedlings in the raised beds this weekend! Stay tuned for the first big work party of the season, and happy April!